Before you buy a best smartphones, you need to know how to hard reset.we provide you top smartphones hard reset solution. Here some Specifications of best smartphone Samsung galaxy A7: Li-Ion 2600 mAh battery (Non-removable), 2G, 3G, 4G, GPRS, EDGE, HSPA, LTE network supported, Optional Dual Sim supported (Dual stand-by), Quad-core 1.7 GHz cortex-A53 & Quad core 1.0 GHz cortex A53 LTE/3G Dual sim model processor or Quad core 1.8 Cortex A15 GHz & Quad core 1.3 cortex A7 GHz – LTE model processor, Super AMOLED capacitive touchscreen,16M colors, RAM 2GB, internal memory 16GB,Expandable memory up to 64 GB(micro-SD),5.5” display, weight 141g, back camera 13 MP, Front camera 5.0 MP, camera pixels 4128 x 3069,LED Flashlight, Bluetooth v4.0,A2DP, EDR, LE, Wi-Fi 802.11 a/b/g/n, dual-band, Wi-Fi Hotspot ,Android OS V4.4.x(KitKat), Compass, Proximity, Accelerometer Sensors, TBC Radio, HTML5 Browser, USB supported, micro USB V2.0.
If you forgotten your phone pattern lock, user code or phone code. I show you how to manually hard reset Samsung galaxy A7 Smartphone.
Hard reset steps:
Step 1: First turn off your Samsung galaxy A7 Android mobile.
Step 2: Release any SIM card or SD card on your mobile.
Step 3: Press and Hold Vol+ key, Home and Power key 10 seconds.
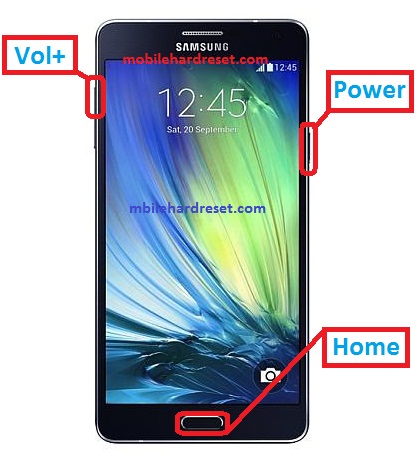
Step 4: When you see on your mobile screen Samsung logo release only Power key, after some time you see Android icon then release all hold key.
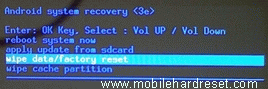
Step 5: You got system recovery mode Use Vol – key select wipe data/factory reset and press Power key to confirm.
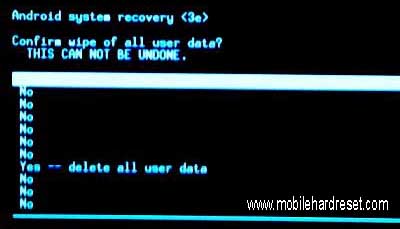
Step 6: Use Vol- key select Yes — delete all user data and press Power key to Confirm. (Notice: when you select Yes — delete all user data and press Power key you lost your phone all user data)
Step 7: Wait until complete hard reset, select reboot system now and press Power key.
Step 8: Now your mobile will reboot.
Step 9: Your smartphone is now ok